
Charlieplexing 12 LEDs
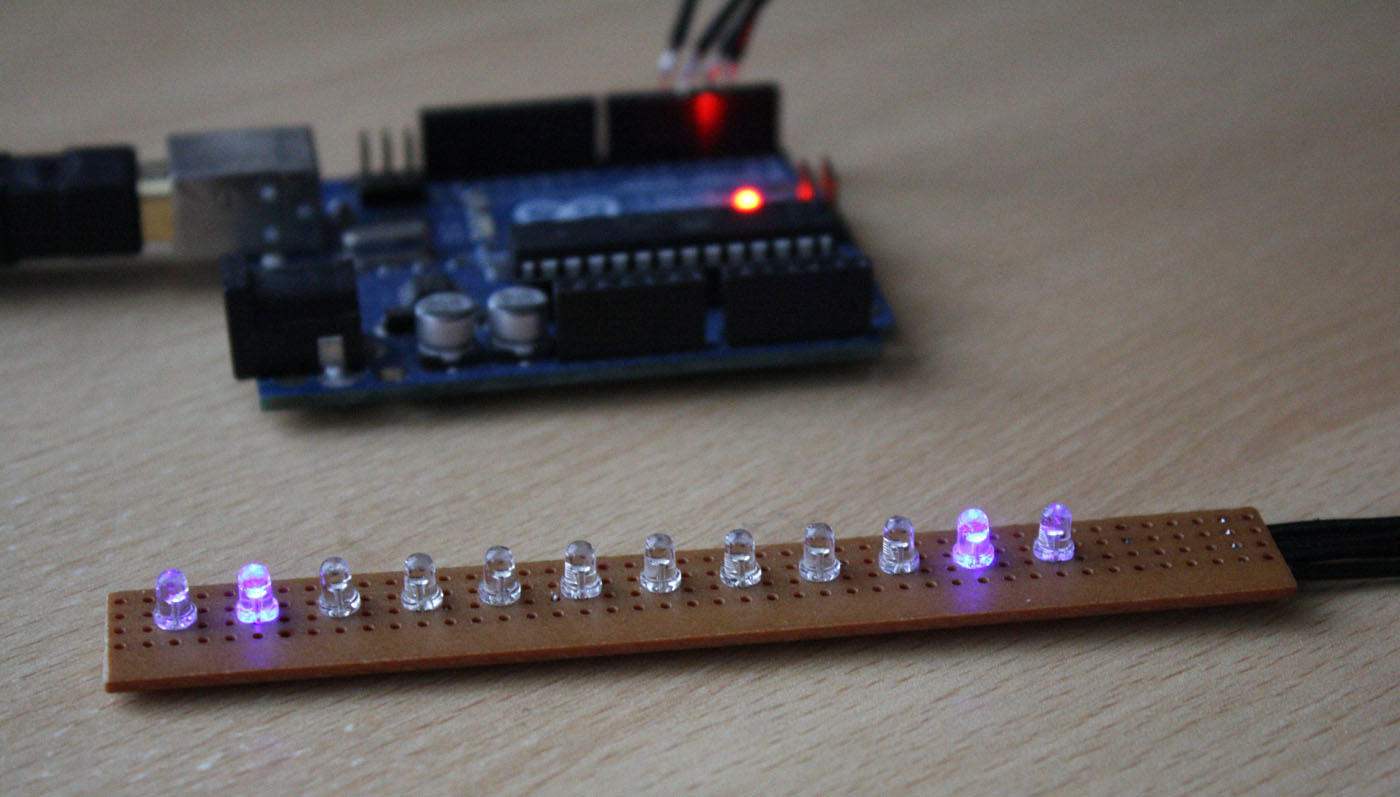
This is actually my second attempt at Charlieplexing. My first attempt was using an old breadboard I had found in the shed – which did actually work, but if you wanted to light more than one LED a second (or indeed more than one "at once") then all sorts of LEDs would start randomly flashing, and chaos generally ensued. I understand that breadboards can have stray capacitances and rogue resistances and other such business, but it may just be that the breadboard was duff. In any case, I did it properly this time, soldering everything onto a piece of stripboard. With success!
First, a brief introduction on Charlieplexing.
Charlieplexing is a method that can be used to control a large number of LEDs using only a few output pins. It's actually quite an interesting technique, and I wouldn't be surprised if you rushed on over to Wikipedia to get the full low-down on it, but you may wish to stick around and see if my simple introduction does you any harm. The two key points to its success are:
- The tri-state logic capabilities of microcontroller pins: high (+5V), low (0V), and, crucially, the input state, which essentially disconnects the pin from the circuit.
- An LED requires a minimum voltage before it will light.
Consider the following diagram with 3 LEDs:
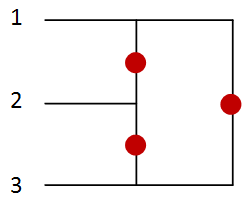
And suppose you have a 3 volt supply you can connect to any two of the three pins – say the first two. Now it's fairly obvious that the first LED will light, with the current following the blue path:
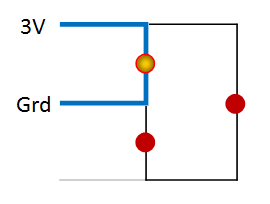
But there's also another path the current can and will take, thus:
However, since there are two LEDs on this path each one will only have 1.5V across it, which (as long as we've chosen the right supply voltage) is below the minimum voltage required for the LED to light. So although all of the LEDs will have a voltage across them, only one will have enough to light, and by swapping the supply between all the (three) combinations of pins we can choose which one this is!
Now since we only have three LEDs and we're using three pins, there doesn't seem to be much advantage to this technique. But as soon as we introduce another pin, we find that we can fit in another three LEDs:
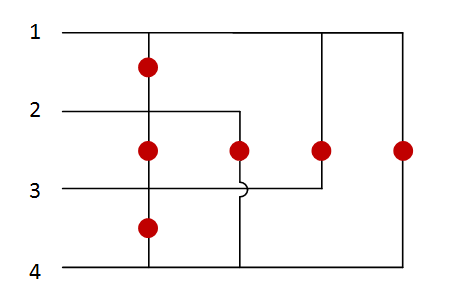
And as before we can control each one separately just by paring up all the different combinations of pins.
In fact, with $n$ pins we can control $\large \frac{n\left( n-1 \right)}{2}$ LEDs!
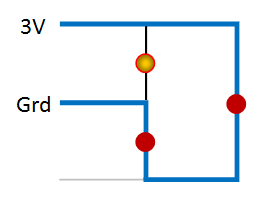
But we can do better than this! Using the fact that LEDs are diodes, we can make use of the polarity of the current to double the number of LEDs we can control. Observe this diagram:
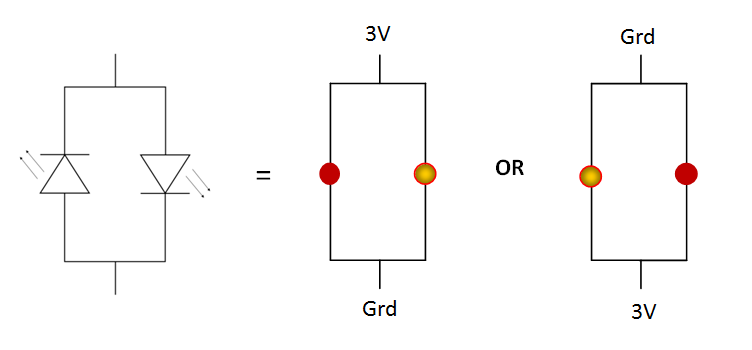
So with each pair of pins we can control two LEDs! Here's a three pin circuit with the full number of LEDs:
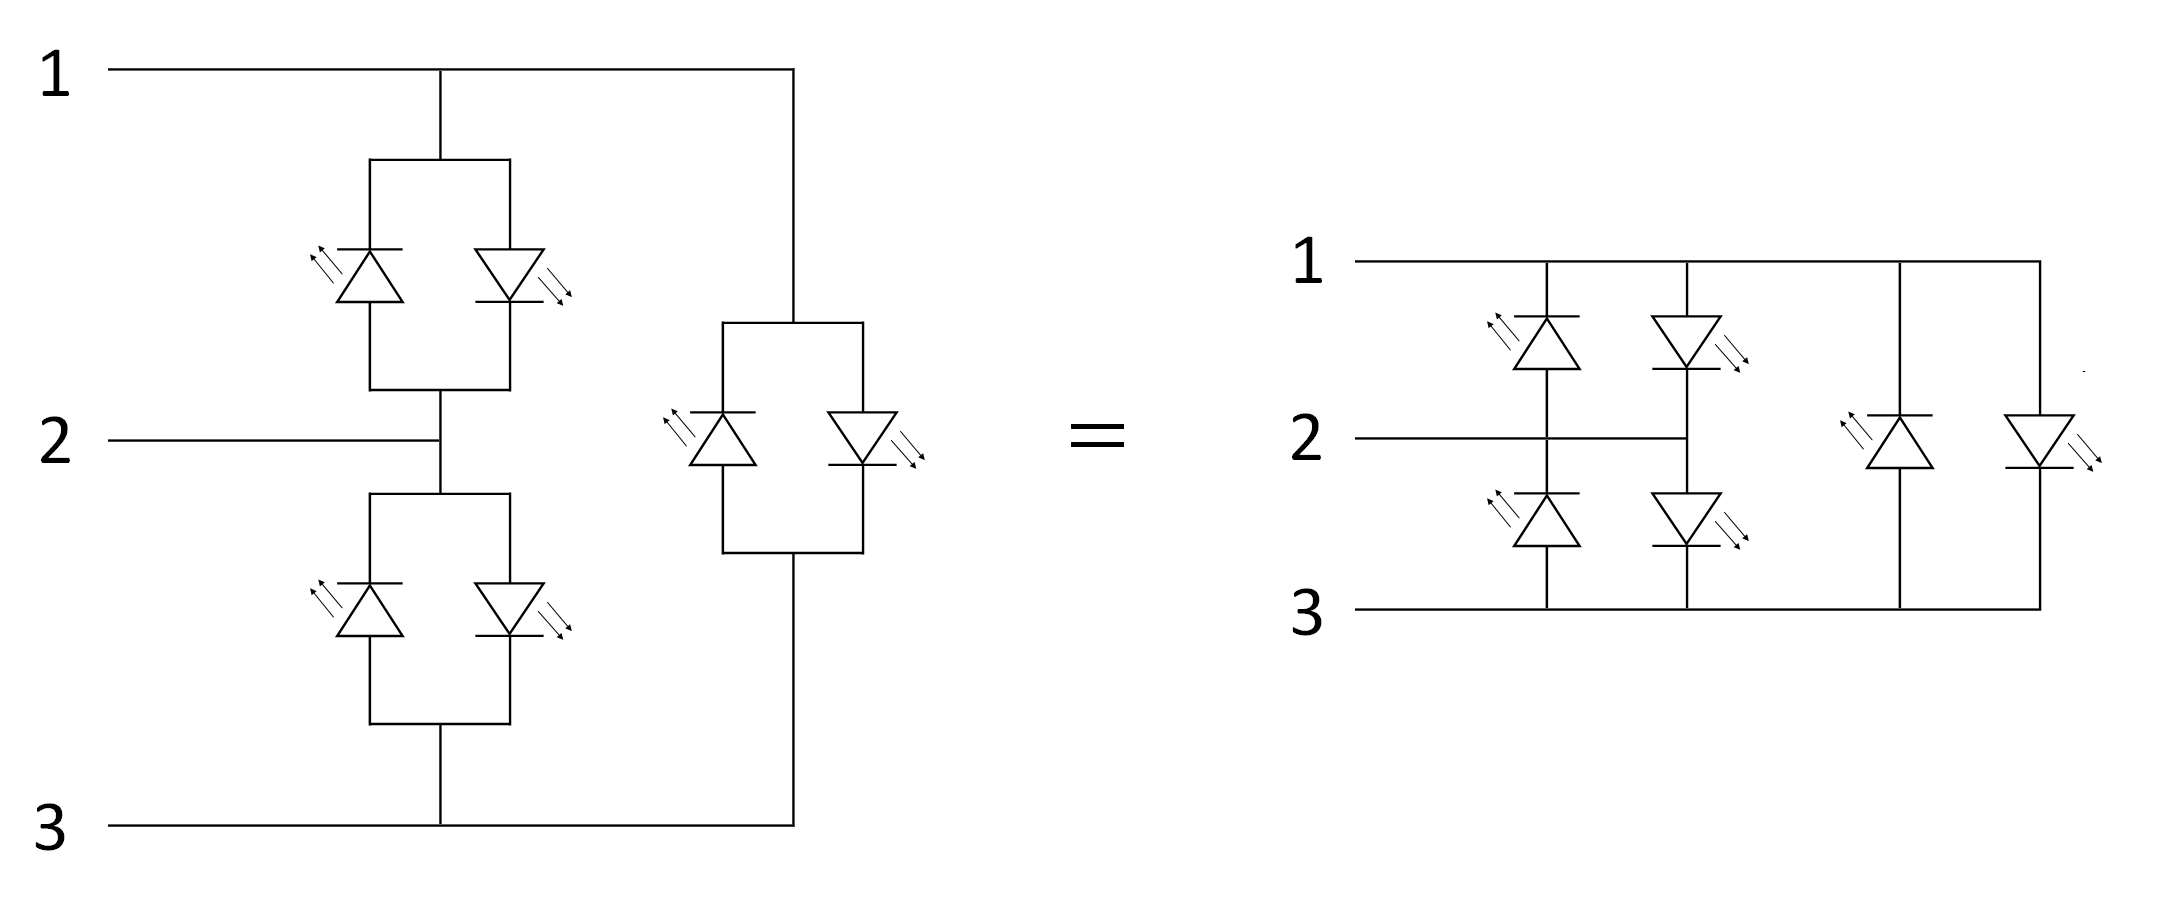
For any math-heads out there, all we're doing is counting all the ways we make different pairs of pins from the available – then doubling because of polarity. So we have a binomial coefficient: $$ \large 2\cdot{}^{n}{{C}_{2}}\normalsize = 2\cdot\large\binom n 2 \normalsize = 2 \cdot\large\frac{n!}{2!\left( n-2 \right)!} \large =n\left( n-1 \right)$$ So with just 4 pins I can control $4\left( 4-1 \right)=12$ LEDs, thus:

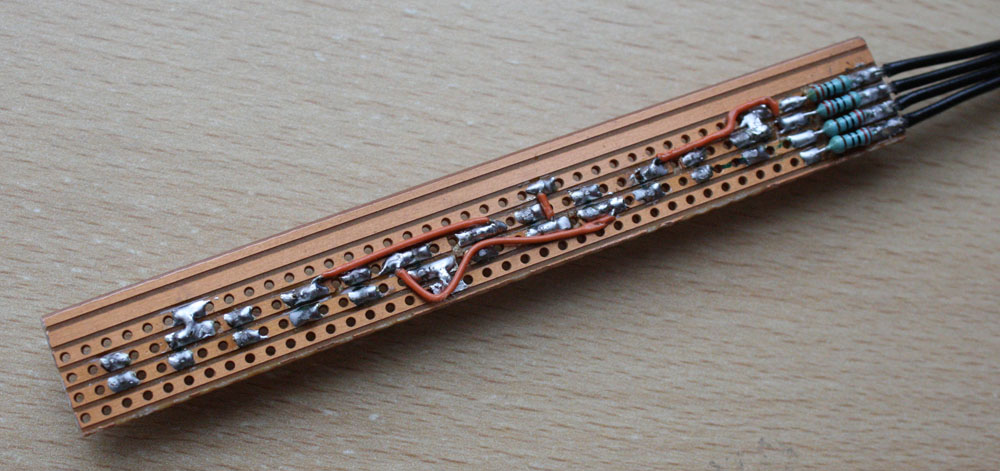
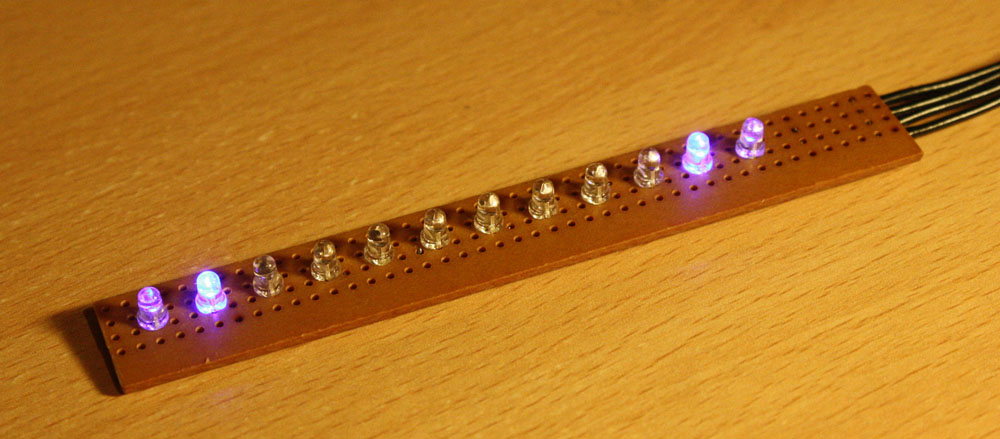
Though that diagram is the clearest to look at, it's a bit of a pain in the posterior when it comes to building the circuit. Since I used stripboard (Veroboard) to build my circuit on this time, I rearranged the circuit to obtain all the LEDs in a line in what I thought was a fairly well stripboard-optimised configuration. To wit:
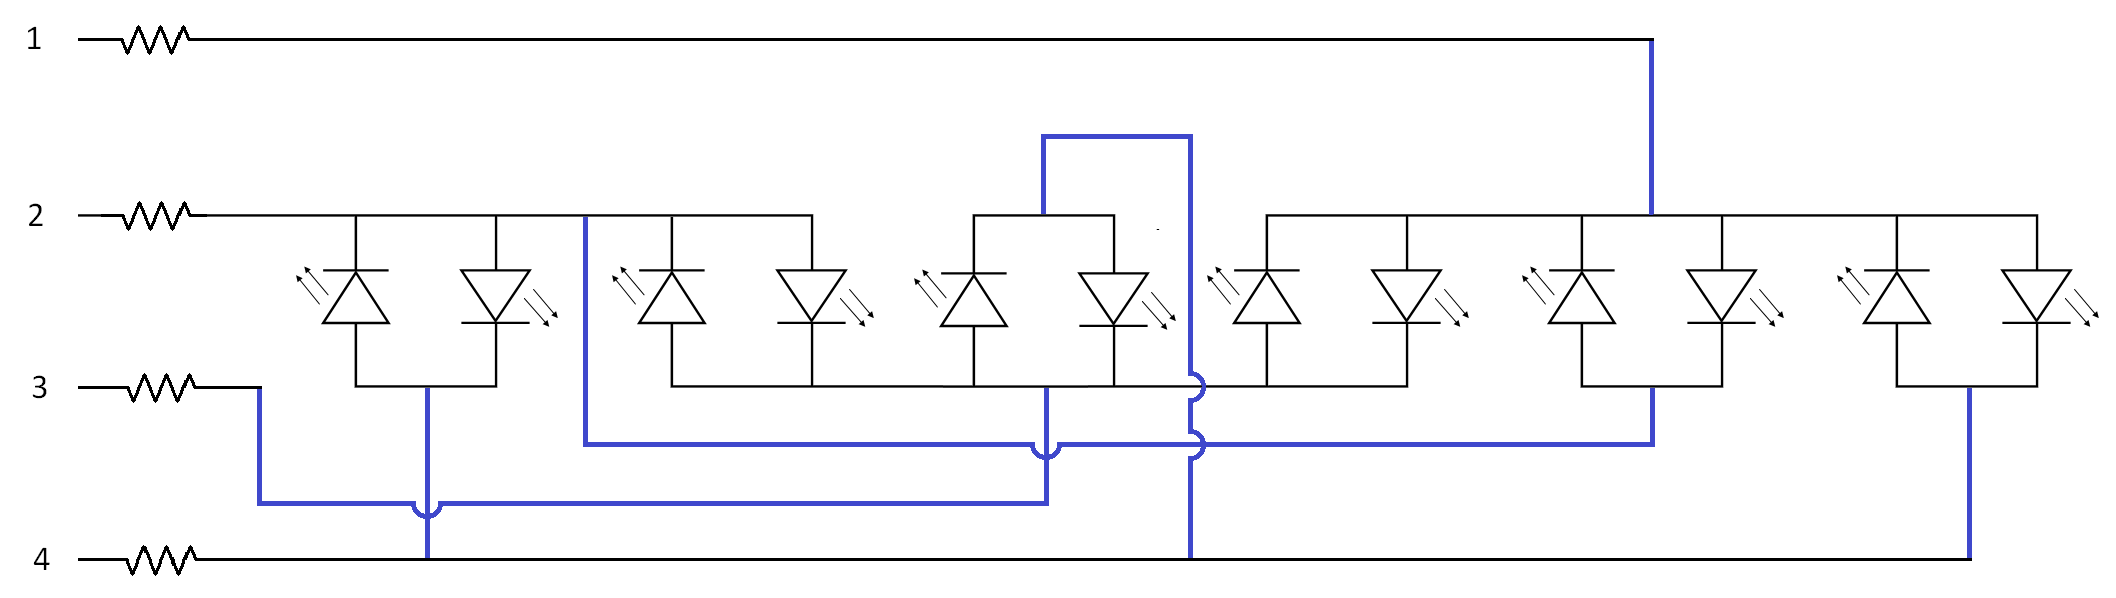
The black lines being rails (or LED pins), and the blue lines wires. Resistors are necessary to protect the microcontroller and prolong the life off the LEDs, and should be around the value according to this formula:
$$R=\displaystyle\frac{{{V}_{\large supply\normalsize}}-{{V}_{LED}}}{2\,\,{{I}_{LED}}}$$The ideal current and voltages vary from LED to LED, but that's what datasheets are for! We also divide by two because the current path for every LED contains two resistors. Following the above formula religiously isn't critical: higher value resistors can be used, generally at the expense of brightness of the LED – up until it doesn't receive enough voltage to light, of course!
Enough theory — on to the build!
As I mentioned above I used a piece of stripboard, and sourced some super-bright LEDs from eBay for a few pounds. It came out pretty well, and fairly neatly:

And here's my code. It includes the basic functions for turning a given LED on or off, and also includes a few more complicated functions, such as brightness controls, and even code to play predefined animations (for example the basic LED chaser, and even a "ball bouncing under gravity" effect – including a trail!).
Applications of Charlieplexing
As novel as it is, the list of applications of Charlieplexing is fairly small. The pin saving that Charlieplexing brings increases as the number of LEDs increases, but unfortunately so do the problems! See Wikipedia for a detailed account, but I'll point out a couple:
- We can only turn on one LED at a time. If we want all the LEDs (appear) to be on at once, we must turn each one on sequentially at a fast rate, and due to persistence of vision we'll see them as all on simultaneously. This is fine for a small number of LEDs, but as we increase their number each LED will be "on" for a shorter and shorter time on average – in other words the duty cycle is decreased, and the LEDs will become dimmer. Of course, you could slow down the rate at which you cycle through the LEDs turning them on, and they would get brighter, but then the persistence of vision illusion will be lost and you'll see flickering.
- If one LED becomes faulty then chaos could ensue. Charlieplexing relies on all the involved LEDs being well behaved. If an LED becomes faulty it not only screws up itself, but also the fate of a number of the other LEDs!
But let's ignore those downsides for a moment; is there anything we can do with Charlieplexing apart from driving an LED display? Well, Wikipedia details how to use the technique for input data multiplexing: reading in the keypresses of a 12-digit numeric keypad using jsut 4 pins – at the expense of 12 diodes.
The only other use I've come up with is perhaps turning each LED into another switch using an opto-couple. Turning $n$ pins into $n(n-1)$ switches for other circuits could be fairly useful. However, the persistence of vision effect that fools us won't fool an optocouple, and we'd need some way of averaging out the pulses. In any case, is saving a few pins worth the drawbacks of Charlieplexing? Probably not. If you really wanted to save pins then shift registers would probably be a better option.
Useful Links